
Monster speaks and we listen and he’s like hey GR1 is the most badass laptop bag ever built.

Mic drop off he goes.
Nobody doubts Monster but…??
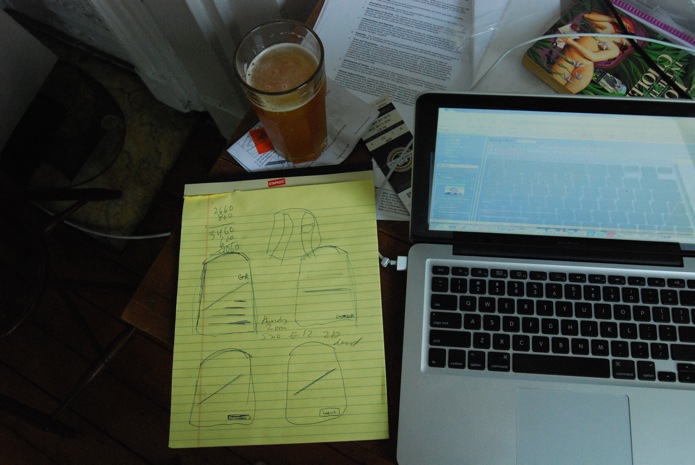
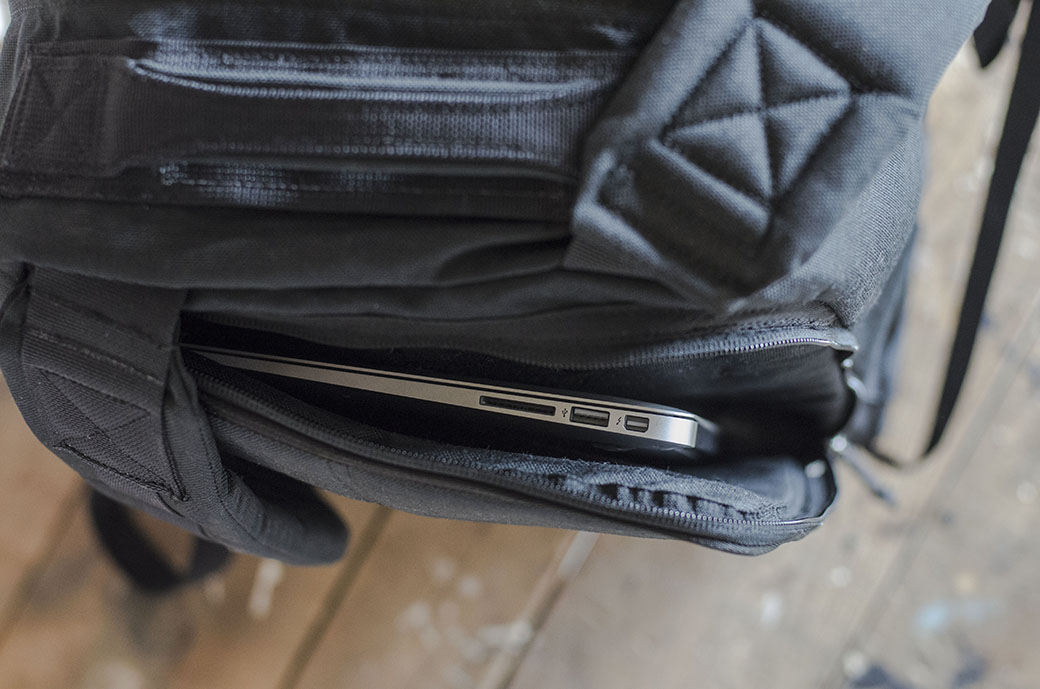
Time warp back to 2008 when we had napkin sketches for what GR1 would become. It had to thrive in Baghdad and NYC which means functions and looks (Rule #1 Always Look Cool). The laptop always had to have its own compartment. It’s easier in and out, easier to secure with padding that’s comfortable next to your back, easier to as we say, make it bombproof.
And since Baghdad (or NYC for that matter) is not the easiest place on gear, or laptops, we literally designed GR1 around the laptop compartment. It sounded easy enough at the time.
Two and a half years later overnight it was done, just like that.
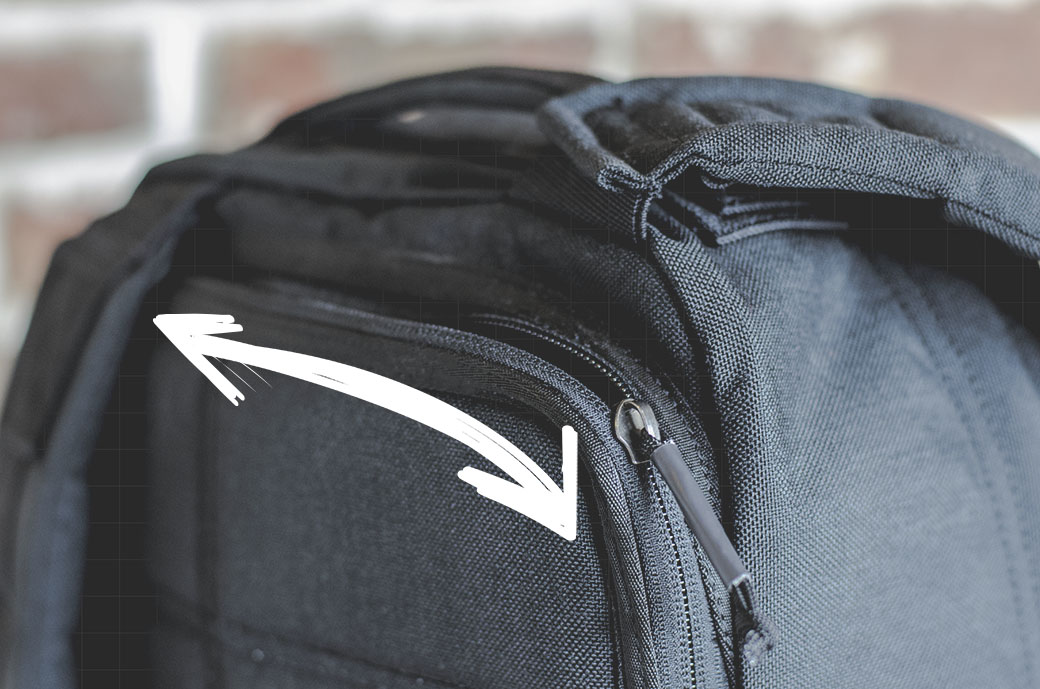
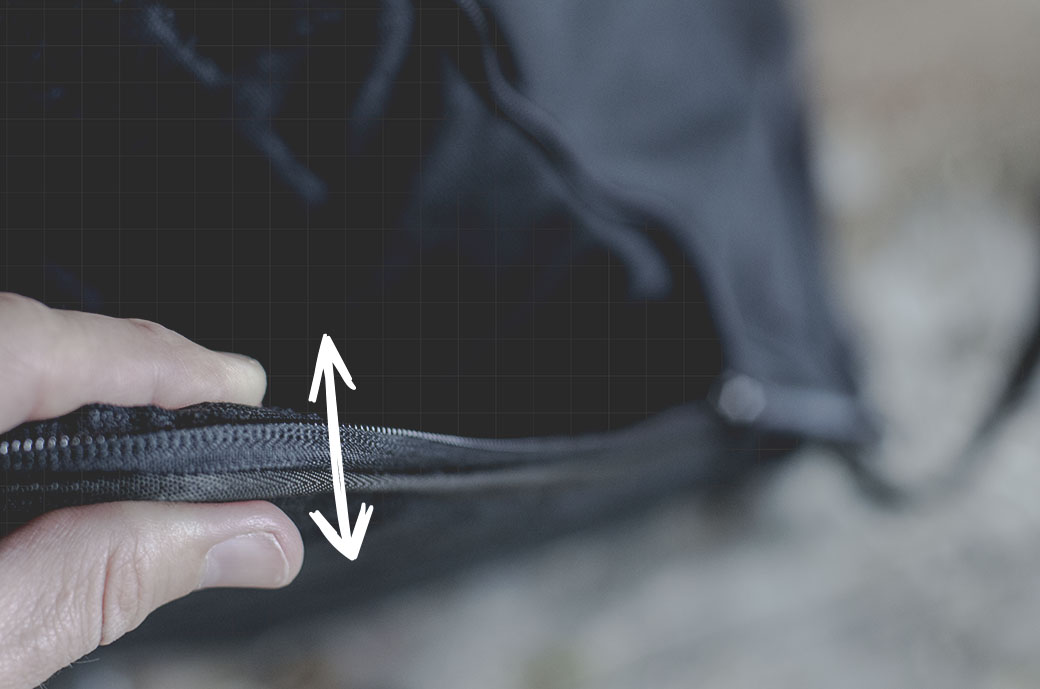
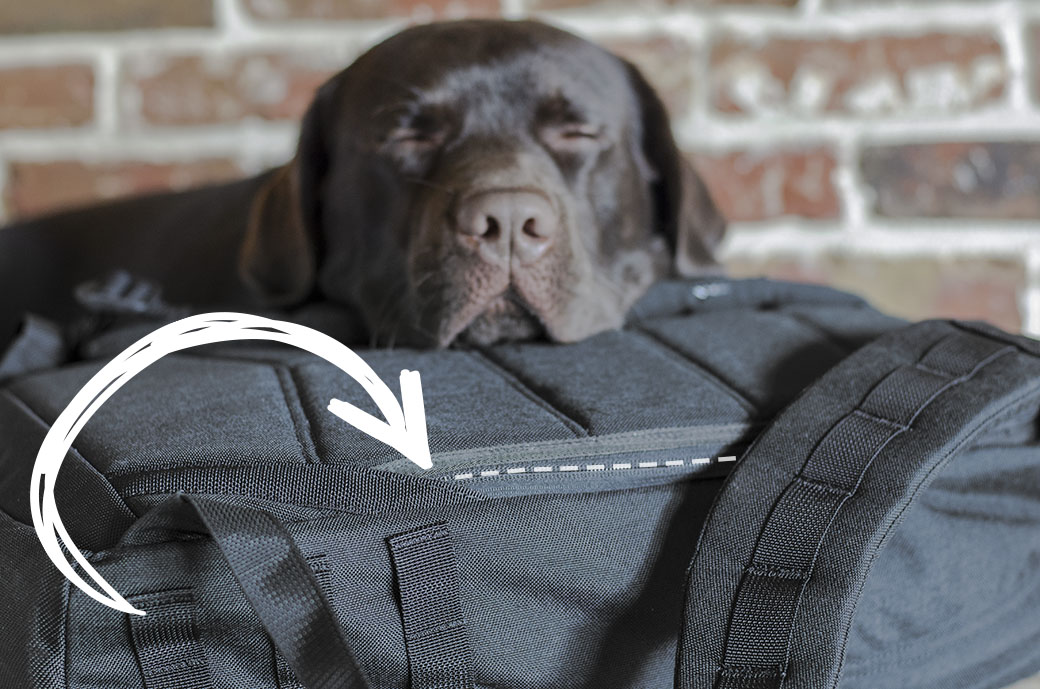
The biggest problem we encountered in the construction was the flow of the zipper around the corner. Prototype after prototype it kept catching and I hated it. The zipper head would catch on the fabric as it made the turn, barely but annoyingly so. If we would have left it like this, over time it would have worn holes in the fabric which means it would fail. When you have a lifetime guarantee on a ruck, that would be a really bad plan. So … enter the 100X zipper test. Every time our designers sent me another prototype – this is in 2009 and 2010 by this point, I’d say here’s what I’m gonna do. I’m gonna take the laptop compartment zipper the full range of motion 100 times, as fast as I can. If it fails, it’s a no go. If it slides smoothly every time, all 100X, we’re in business.
Welcome to the next year to get right.
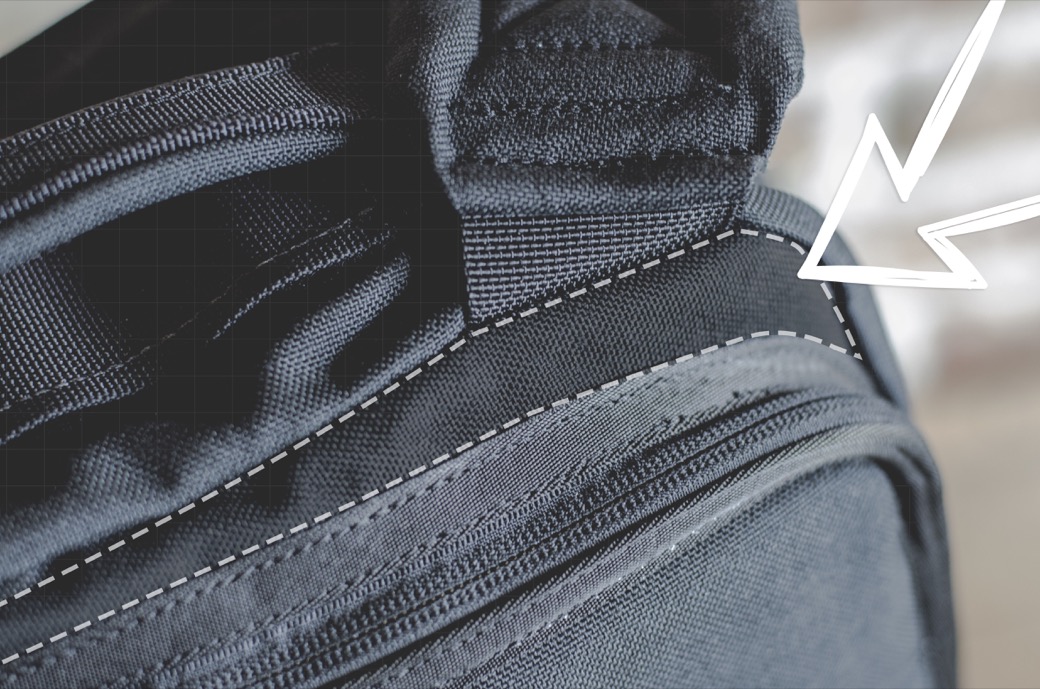
Eventually after a lot of almost 100X passes they had to create a separate pattern piece, a panel internally called the “bird beak” above the zipper but below where the straps are sewn into the top of the ruck. I don’t know how to sew anything, which was actually liberating because it shouldn’t matter whether you can sew either, you just want it to work. I was told more than once that it wasn’t possible to meet the 100X zipper test. So I played ignorant to the difficulties, prototype after prototype, and they came up with the bird beak. It required some tweaking after the first version, but very shortly after GR1 passed the 100X zipper test.
If you’re in any kind of consumer goods business you want people to feel confident about your stuff when they touch it – even better if it actually works, too, lol. When you squeeze the padding in the back panel, you won’t have any doubts about how secure your laptop will be in there. It breeds confidence.
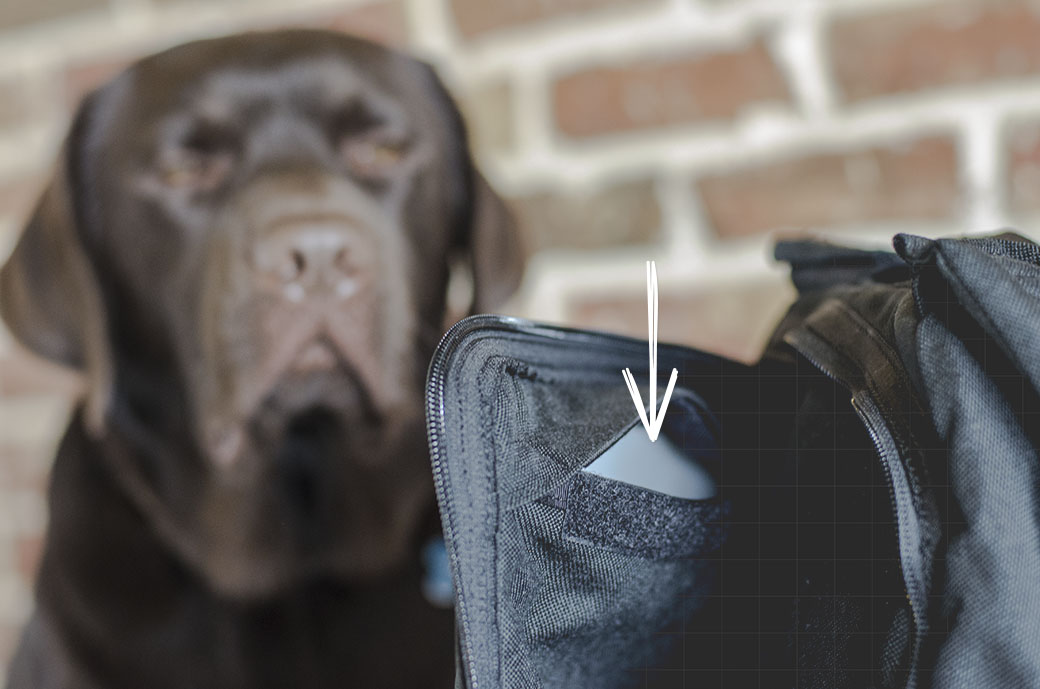
There’s a hard plastic frame sheet in the back panel, secured with a Velcro closure.
The job of the frame sheet is to help the ruck keep its structural integrity north south while you have weight (of any kind) in the ruck. If there is no frame sheet, the ruck will have the tendency to curl on itself while you’re wearing it, which is uncomfortable and not ideal.
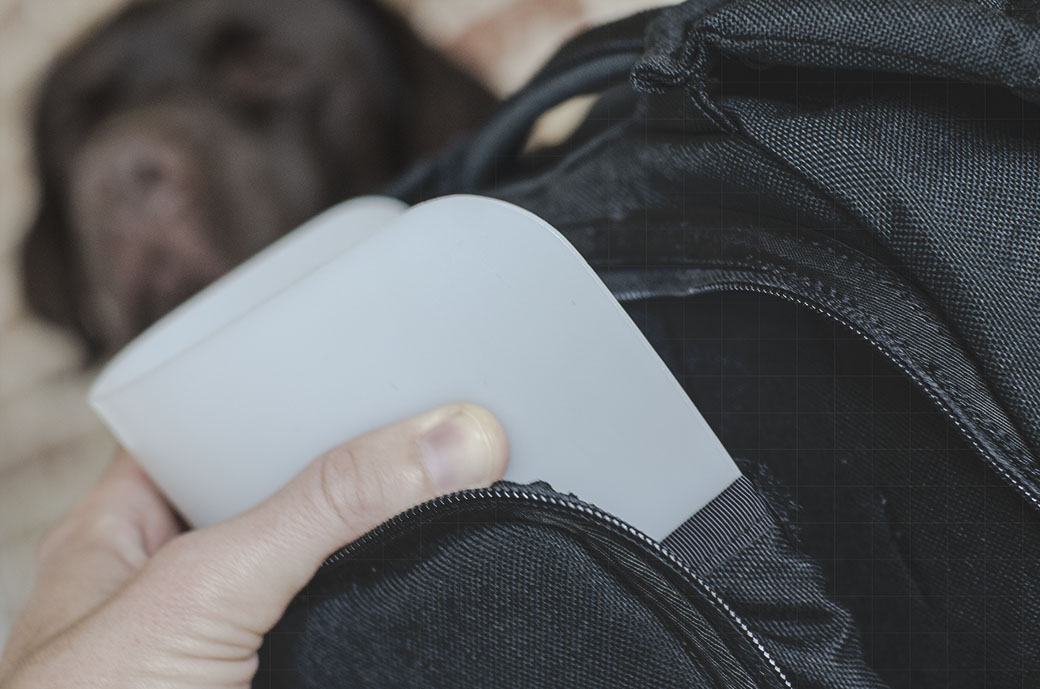
We never really intended for people to take it out, and I don’t recommend you take it out. Some people have added stiffer plastic in there over the years, but I’ve never modified mine despite carrying very heavy loads. The Velcro closure/opening is necessary for the construction/build process of the ruck. It would have been impossible for our sewers to close the bag, meaning to attach the back/laptop panel to the main compartment – which is the hardest part of 3+ hours it takes to build a GR1 – if the frame sheet were sewn in/not-removable.
Once the ruck is complete, putting the frame sheet in there is the final step. To get it in there, we have to give it the shape of a “taco” and push it in there. If you ever wanted to get it out, you’d have to do the same taco thing.

I’ve got it on top of the back panel. You can see it doesn’t go the entire way to the bottom of the ruck, that’s because the padded “false bottom” compartment/panel separates the laptop compartment from the padded bottom of the ruck.
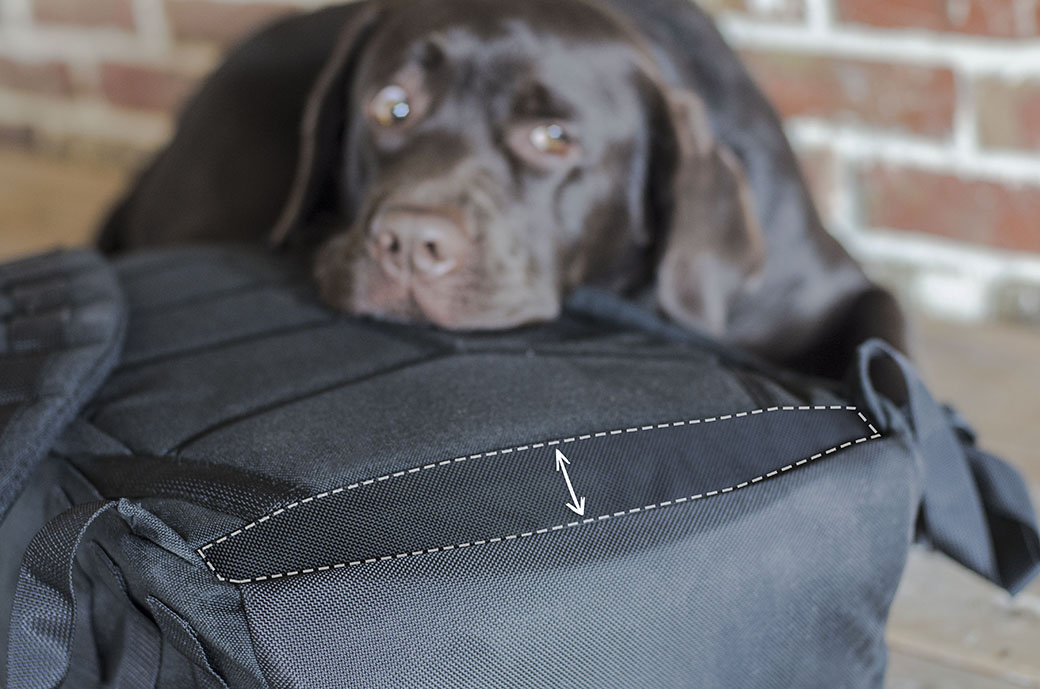
The false bottom. Basically, when you set the bottom of your ruck on the ground, you don’t want your laptop to notice. That’s what the padded 1” separation known as the false bottom does for you. You set your GR1 down on the concrete and you don’t hear a thump because your laptop feels the padding not the ground.
Why does the zipper end here along the side? Basically because it doesn’t need to go all the way down for the laptop to be easy in easy out. And because at that bottom corner of the ruck, there are a lot of components coming together. The false bottom, the shoulder straps, and the bottom of the ruck are all down there. So it was necessary to push the laptop compartment’s zipper up a few inches, which reduces the bulk down there in the seams thereby making the build easier than it would be if the zipper also went all the way down. Complexity is the enemy.

And resting easy is the goal.
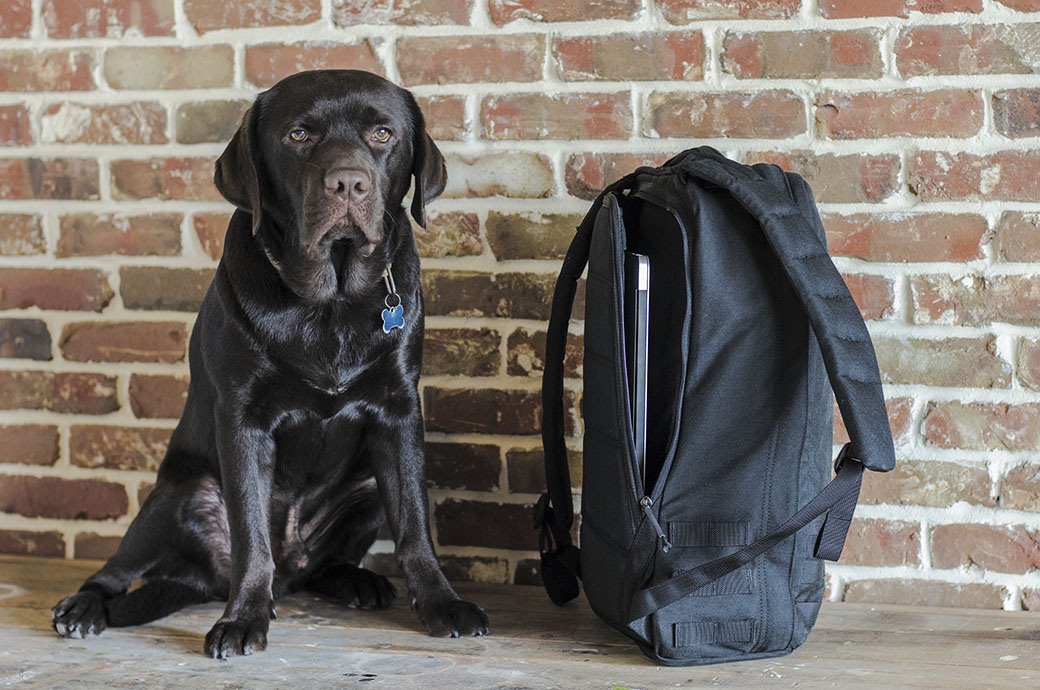
So when you have your $1,000 or your $2,000 laptop and you’re looking for easy in easy out and want to protect it with confidence across time zones, on subways, and in the harshest environments imaginable, it’s called GR1. As Monster says, the most badass laptop bag ever built.
Buy GR1.
Are you going to restock any of the gr1 multicam ones anytime soon? I have been wanting to buy a gr1 as my first ruck but would like to get multicam color.
wachstumshormon hgh kaufen
References:
nrimatchmaking.com
hgh türkei kaufen
References:
seychelleslove.com
hgh bodybuilding kaufen
References:
https://a-taxi.com.ua
hgh spray kaufen
References:
humanlove.stream
hgh kaufen deutschland
References:
kanban.xsitepool.tu-freiberg.de
hgh kaufen deutschland
lean bulk cycle
References:
https://www.appleradish.org
prescription steroid cream names
References:
git.repo.in.net
alternative to steroids
References:
git.wun.im
cutting bodybuilding
References:
tools.refinecolor.com
Nonetheless, it’s additionally identified for bloating and estrogenic side
effects, so it’s typically stacked with an aromatase inhibitor or
different support brokers. For example, fast-acting oral
steroids like Anadrol and Dianabol are considered extraordinarily potent because they produce fast size and energy features, typically within days.
It also raises the levels of the protein in pink blood cells that carries oxygen to the physique’s
organs, called hemoglobin. The anabolic steroids used by
athletes are often forms of testosterone made in a lab. Irreversible
modifications include male-pattern baldness and breast improvement (gynecomastia) in men ninety
six, ninety seven. Anabolic steroids may act upon the hormone system to extend the danger of testicular cancer,
particularly when steroids are utilized in mixture with insulin-like progress issue
ninety eight. A approach referred to as “plateauing” may
be used, whereby anabolic steroids are staggered, overlapped, or substituted with one other type of anabolic steroid to keep away from creating tolerance 71.
Elevate your positive aspects with HGH-X2, a testament to reaching optimum outcomes with
minimal risks within the realm of legal and secure performance enhancement.
IGF-1 has been linked to more muscle acquire, extra fat loss, better hair,
higher skin, better quality of life, higher sleep, and even a
better sexual life. Famend because the ‘lady steroid,’ Anvarol stands out for its delicate side effects, distinguishing
it as one of the most secure choices on the planet of performance-enhancing substances.
They pose quite a lot of well being risks and some different nasty side effects as properly.
The listing under consists of only a small fraction of the potentially
dangerous products marketed to customers on-line and in shops.
This can be true all through history, with its use being rife amongst
traditional bodybuilders in the 1970s, serving to to add unimaginable amounts of mass in the off-season.
Anadrol (oxymetholone) is a powerful DHT-derived compound
and arguably the best steroid for mass achieve. Due To This
Fact, customers sometimes will only utilize mibolerone for a quick time (i.e., a
couple of days before a particular fighting event) and chorus
from drinking alcohol during the cycle. A major downside we see
with mibolerone is that it’s very hepatotoxic, causing extreme pressure
in your liver. Although the liver is mostly a resilient organ,
this compound will trigger notable irritation and damage.
It is a very effective option for those looking for speedy muscle progress but it’s additionally one of many hardest steroids
to manage. We have had sufferers who utilized steroids and did not prepare, and so
they constructed muscle and burned fat despite being sedentary (inactive).
However, their results are notably lowered compared to customers who mix steroids with weightlifting.
Clenbuterol is often incorrectly referred to as a slicing steroid as a result of its anabolic results,
a minimum of in research. Nonetheless, Clenbuterol vrouwen: een gids over dosering’s most potent trait, in our experience, is its metabolic
results.
Anabolic steroids could be legally prescribed by licensed healthcare
providers to treat situations such as hormone deficiencies,
delayed puberty, or muscle loss as a end result of ailments like most cancers or AIDS.
These prescriptions have to be rigorously monitored and documented
to make sure therapeutic use. The legal penalties for possessing or
distributing anabolic steroids in California are important and
differ depending on the offense. Penalties range from misdemeanors to felonies, reflecting the seriousness of these violations.
The substance is used in humans to decrease blood strain and reduces heart rate.
The FEI Medicine Sub-Committee grades the substance as one which
has high potential to affect efficiency.
This means that pubertal steroid exposure might produce long-lasting structural modifications in sure mind areas 148.
Research also indicates that some users might turn to different medication to alleviate some of the unfavorable results of anabolic steroids.
For instance, a study of 227 males admitted in 1999 to a private therapy middle
for addiction to heroin or other opioids
discovered that 9.3 percent had beforehand misused anabolic steroids
142. Of these, most reported utilizing opioids to counteract insomnia,
irritability, melancholy, and withdrawal from anabolic steroids 142.
Withdrawal from anabolic steroids happens when an individual develops dependence.
A review of the analysis means that about 32 percent
of individuals that misuse anabolic steroids turn into dependent
43.
This could point out that turkesterone is the more potent
of the two ecdysteroids. Turkesterone additionally promotes lean weight achieve
as opposed to Dianabol, which causes notable amounts of water retention. These outcomes are distinctive considering turkesterone is a natural
substance, in comparability with Dianabol (methandrostenolone) being
an anabolic steroid. Thus, in theory, if a supplement could
considerably increase testosterone levels to the identical diploma as steroids, it might additionally mimic their
results. Mild and powerful, Anavar (Oxandrolone) is appreciated
as a lean mass gainer that causes minimal opposed reactions.
One notable exception is nandrolone, which is transformed into
dihydronandrolone (DHN) by 5α-reductase. Nevertheless, whereas testosterone is converted into the more potent androgen DHT by 5α-reductase (21), the conversion of nandrolone into
DHN yields an androgen with significantly decrease binding affinity for the AR (77, 78).
Thus, whereas testosterone’s actions may be amplified in tissues expressing 5α-reductase, nandrolone’s actions might be diminished (21).
Anavar is a steroid that can be injected, or administered orally in pill
kind. Also known as Oxandrolone, Anavar is a superb steroid for cutting fat and growing power and strength levels in the fitness center.
They then often bind to Androgen receptors, and drive a change onto the physique that is helpful for efficiency.
We have discovered this steroid cycle to be a more standard protocol among intermediate steroid customers.
This combination of testosterone and Deca Durabolin is the least toxic bulking stack in our experience.
Intermediate users generally administer this stack once their
physique comfortably tolerates testosterone-only cycles.
Anadrol is an oral steroid, which makes it advantageous for people who wish to circumvent injections.
Anecdotally, we’ve observed that first-time Anadrol cycles can add over 30 pounds to a user’s weight.
(10 euros gratis apuestas|10 mejores casas de apuestas|10 trucos
para ganar apuestas|15 euros gratis marca apuestas|1×2
apuestas|1×2 apuestas deportivas|1×2 apuestas que significa|1×2 en apuestas|1×2 en apuestas
que significa|1×2 que significa en apuestas|5 euros gratis apuestas|9 apuestas que siempre ganaras|a partir de cuanto se declara apuestas|actividades de juegos de azar y apuestas|ad apuestas deportivas|aleksandre topuria ufc
apuestas|algoritmo para ganar apuestas deportivas|america apuestas|análisis nba apuestas|aplicacion android apuestas deportivas|aplicacion apuestas deportivas|aplicacion apuestas deportivas android|aplicación de apuestas online|aplicacion para hacer apuestas|aplicacion para hacer
apuestas de futbol|aplicación para hacer apuestas de fútbol|aplicaciones
apuestas deportivas android|aplicaciones apuestas deportivas gratis|aplicaciones de apuestas android|aplicaciones de apuestas de fútbol|aplicaciones de apuestas deportivas|aplicaciones de apuestas deportivas peru|aplicaciones de apuestas deportivas
perú|aplicaciones de apuestas en colombia|aplicaciones de apuestas gratis|aplicaciones de apuestas online|aplicaciones de apuestas seguras|aplicaciones de
apuestas sin dinero|aplicaciones para hacer apuestas|apostar seguro apuestas deportivas|app android apuestas deportivas|app apuestas|app apuestas android|app apuestas de futbol|app apuestas deportivas|app
apuestas deportivas android|app apuestas deportivas argentina|app apuestas deportivas
colombia|app apuestas deportivas ecuador|app apuestas deportivas españa|app apuestas deportivas gratis|app apuestas entre amigos|app apuestas futbol|app apuestas gratis|app apuestas
sin dinero|app casa de apuestas|app casas de apuestas|app control apuestas|app de
apuestas|app de apuestas android|app de apuestas casino|app de apuestas colombia|app
de apuestas con bono de bienvenida|app de apuestas de futbol|app de apuestas
deportivas|app de apuestas deportivas android|app de apuestas deportivas
argentina|app de apuestas deportivas colombia|app de apuestas deportivas
en españa|app de apuestas deportivas peru|app de apuestas deportivas perú|app de apuestas deportivas sin dinero|app de apuestas ecuador|app de apuestas en colombia|app de apuestas
en españa|app de apuestas en venezuela|app de apuestas futbol|app de apuestas gratis|app de apuestas online|app de apuestas para
android|app de apuestas para ganar dinero|app de
apuestas peru|app de apuestas reales|app de casas de apuestas|app marca apuestas android|app moviles de apuestas|app para apuestas|app para apuestas de futbol|app
para apuestas deportivas|app para apuestas deportivas en español|app
para ganar apuestas deportivas|app para hacer apuestas|app para
hacer apuestas deportivas|app para hacer apuestas entre amigos|app para llevar control
de apuestas|app pronosticos apuestas deportivas|app versus apuestas|apps apuestas
mundial|apps de apuestas|apps de apuestas con bono de
bienvenida|apps de apuestas de futbol|apps de apuestas deportivas peru|apps de apuestas mexico|apps
para apuestas|aprender a hacer apuestas deportivas|aprender hacer apuestas deportivas|apuesta del dia apuestas deportivas|apuestas 10 euros gratis|apuestas 100 seguras|apuestas 1×2|apuestas 1X2|apuestas 2 division|apuestas 3 division|apuestas a caballos|apuestas a carreras de caballos|apuestas a colombia|apuestas a
corners|apuestas a ganar|apuestas a jugadores nba|apuestas a la baja|apuestas a la nfl|apuestas
al barcelona|apuestas al dia|apuestas al empate|apuestas al
mundial|apuestas al tenis wta|apuestas alaves barcelona|apuestas alcaraz hoy|apuestas alemania españa|apuestas alonso campeon del mundo|apuestas altas y bajas|apuestas altas y
bajas nfl|apuestas ambos equipos marcan|apuestas america|apuestas android|apuestas anillo nba|apuestas antes del mundial|apuestas anticipadas|apuestas anticipadas nba|apuestas apps|apuestas arabia argentina|apuestas
argentina|apuestas argentina campeon del mundo|apuestas argentina canada|apuestas argentina colombia|apuestas argentina croacia|apuestas argentina españa|apuestas argentina francia|apuestas
argentina francia cuanto paga|apuestas argentina francia mundial|apuestas argentina gana
el mundial|apuestas argentina gana mundial|apuestas argentina holanda|apuestas argentina mexico|apuestas argentina méxico|apuestas argentina mundial|apuestas argentina online|apuestas argentina paises bajos|apuestas argentina polonia|apuestas argentina uruguay|apuestas argentina vs australia|apuestas argentina vs colombia|apuestas
argentina vs francia|apuestas argentina vs peru|apuestas argentinas|apuestas arsenal real madrid|apuestas ascenso a primera division|apuestas ascenso a segunda|apuestas asiaticas|apuestas asiatico|apuestas athletic|apuestas athletic
atletico|apuestas athletic barça|apuestas athletic
barcelona|apuestas athletic betis|apuestas athletic manchester|apuestas athletic manchester united|apuestas
athletic osasuna|apuestas athletic real|apuestas athletic real madrid|apuestas athletic real sociedad|apuestas athletic real sociedad final|apuestas athletic
roma|apuestas athletic sevilla|apuestas athletic valencia|apuestas atletico|apuestas atletico barcelona|apuestas
atletico barsa|apuestas atletico campeon champions|apuestas
atletico campeon de liga|apuestas atlético copenhague|apuestas atletico de madrid|apuestas
atlético de madrid|apuestas atletico de madrid barcelona|apuestas atletico de madrid
gana la liga|apuestas atletico de madrid real
madrid|apuestas atlético de madrid real madrid|apuestas atletico de madrid vs
barcelona|apuestas atletico madrid|apuestas atletico madrid real madrid|apuestas atletico madrid vs
barcelona|apuestas atletico real madrid|apuestas atletico real madrid
champions|apuestas atletismo|apuestas bajas|apuestas
baloncesto|apuestas baloncesto acb|apuestas baloncesto handicap|apuestas baloncesto hoy|apuestas baloncesto
juegos olimpicos|apuestas baloncesto nba|apuestas baloncesto
pronostico|apuestas baloncesto pronósticos|apuestas baloncesto prorroga|apuestas barca|apuestas barca athletic|apuestas barca atletico|apuestas barca bayern|apuestas barca
bayern munich|apuestas barca girona|apuestas barca hoy|apuestas barça
hoy|apuestas barca inter|apuestas barca juventus|apuestas barca madrid|apuestas barça
madrid|apuestas barca real madrid|apuestas barca vs juve|apuestas
barca vs madrid|apuestas barca vs psg|apuestas barcelona|apuestas barcelona alaves|apuestas barcelona athletic|apuestas barcelona
atletico|apuestas barcelona atletico de madrid|apuestas barcelona atlético de madrid|apuestas barcelona
atletico madrid|apuestas barcelona bayern|apuestas
barcelona betis|apuestas barcelona campeon de liga|apuestas barcelona celta|apuestas
barcelona espanyol|apuestas barcelona gana la champions|apuestas barcelona girona|apuestas barcelona granada|apuestas barcelona hoy|apuestas barcelona inter|apuestas barcelona madrid|apuestas barcelona osasuna|apuestas barcelona psg|apuestas barcelona real madrid|apuestas barcelona
real sociedad|apuestas barcelona sevilla|apuestas barcelona valencia|apuestas
barcelona villarreal|apuestas barcelona vs atletico
madrid|apuestas barcelona vs madrid|apuestas barcelona vs
real madrid|apuestas barsa madrid|apuestas basket hoy|apuestas
bayern barcelona|apuestas bayern vs barcelona|apuestas beisbol|apuestas béisbol|apuestas
beisbol mlb|apuestas beisbol pronosticos|apuestas beisbol venezolano|apuestas betis|apuestas betis –
chelsea|apuestas betis barcelona|apuestas betis chelsea|apuestas betis
fiorentina|apuestas betis girona|apuestas betis madrid|apuestas betis mallorca|apuestas betis real madrid|apuestas betis real sociedad|apuestas betis sevilla|apuestas betis
valencia|apuestas betis valladolid|apuestas betis
vs valencia|apuestas betplay hoy colombia|apuestas betsson peru|apuestas bienvenida|apuestas billar online|apuestas bolivia vs colombia|apuestas bono|apuestas bono
bienvenida|apuestas bono de bienvenida|apuestas bono de bienvenida sin deposito|apuestas bono gratis|apuestas bono
sin deposito|apuestas bonos sin deposito|apuestas borussia real madrid|apuestas boxeo|apuestas boxeo de campeonato|apuestas boxeo españa|apuestas boxeo
español|apuestas boxeo femenino olimpiadas|apuestas boxeo hoy|apuestas boxeo online|apuestas
brasil colombia|apuestas brasil peru|apuestas brasil uruguay|apuestas brasil vs
colombia|apuestas brasil vs peru|apuestas caballos|apuestas caballos
colocado|apuestas caballos españa|apuestas caballos hipodromo|apuestas caballos hoy|apuestas caballos madrid|apuestas caballos online|apuestas
caballos sanlucar de barrameda|apuestas caballos zarzuela|apuestas
calculador|apuestas campeon|apuestas campeon champions|apuestas campeón champions|apuestas campeon champions 2025|apuestas campeon champions league|apuestas campeon conference league|apuestas campeon copa america|apuestas
campeon copa del rey|apuestas campeon de champions|apuestas campeon de la champions|apuestas campeon de
liga|apuestas campeon del mundo|apuestas campeon eurocopa|apuestas campeón eurocopa|apuestas campeon europa league|apuestas campeon f1|apuestas campeon f1 2025|apuestas campeon formula 1|apuestas campeon libertadores|apuestas
campeon liga|apuestas campeon liga bbva|apuestas campeon liga española|apuestas campeon liga
santander|apuestas campeon motogp 2025|apuestas campeon mundial|apuestas campeón mundial|apuestas campeon mundial
baloncesto|apuestas campeon nba|apuestas campeón nba|apuestas campeon premier|apuestas campeon premier league|apuestas campeon roland garros|apuestas campeonato
f1|apuestas campeonatos de futbol|apuestas carrera de caballos|apuestas carrera de
caballos hoy|apuestas carrera de caballos nocturnas|apuestas carrera
de galgos fin de semana|apuestas carrera de galgos hoy|apuestas carrera de galgos nocturnas|apuestas
carreras caballos|apuestas carreras caballos sanlucar|apuestas carreras de caballos|apuestas carreras de caballos en directo|apuestas carreras de caballos
en vivo|apuestas carreras de caballos españa|apuestas carreras
de caballos hoy|apuestas carreras de caballos nacionales|apuestas carreras de
caballos nocturnas|apuestas carreras de caballos online|apuestas carreras de caballos sanlucar|apuestas carreras
de caballos sanlúcar|apuestas carreras de galgos|apuestas carreras de galgos en vivo|apuestas carreras de galgos nocturnas|apuestas carreras de galgos pre partido|apuestas casino|apuestas casino
barcelona|apuestas casino futbol|apuestas casino gran madrid|apuestas casino gratis|apuestas casino madrid|apuestas casino
online|apuestas casino online argentina|apuestas
casinos|apuestas casinos online|apuestas celta|apuestas celta barcelona|apuestas celta betis|apuestas
celta eibar|apuestas celta espanyol|apuestas celta granada|apuestas celta
madrid|apuestas celta manchester|apuestas celta real madrid|apuestas champion league|apuestas champions foro|apuestas champions hoy|apuestas champions league|apuestas champions league
– pronósticos|apuestas champions league 2025|apuestas champions league hoy|apuestas champions league pronosticos|apuestas champions league
pronósticos|apuestas champions pronosticos|apuestas chelsea barcelona|apuestas chelsea betis|apuestas chile|apuestas chile
peru|apuestas chile venezuela|apuestas chile vs colombia|apuestas chile vs uruguay|apuestas
ciclismo|apuestas ciclismo en vivo|apuestas ciclismo femenino|apuestas ciclismo tour francia|apuestas ciclismo vuelta|apuestas ciclismo vuelta a españa|apuestas ciclismo vuelta españa|apuestas city
madrid|apuestas city real madrid|apuestas clasico|apuestas
clasico español|apuestas clasico real madrid barcelona|apuestas clasificacion mundial|apuestas colombia|apuestas colombia argentina|apuestas colombia brasil|apuestas colombia paraguay|apuestas colombia uruguay|apuestas colombia vs argentina|apuestas colombia vs brasil|apuestas combinadas|apuestas combinadas como funcionan|apuestas combinadas de futbol|apuestas combinadas
de fútbol|apuestas combinadas foro|apuestas combinadas futbol|apuestas combinadas hoy|apuestas combinadas mismo partido|apuestas combinadas mundial|apuestas combinadas nba|apuestas
combinadas para esta semana|apuestas combinadas para hoy|apuestas
combinadas para mañana|apuestas combinadas pronosticos|apuestas combinadas
recomendadas|apuestas combinadas seguras|apuestas
combinadas seguras para hoy|apuestas combinadas seguras para mañana|apuestas como ganar|apuestas comparador|apuestas con bono de bienvenida|apuestas con dinero ficticio|apuestas con dinero real|apuestas con dinero virtual|apuestas con handicap|apuestas con handicap asiatico|apuestas
con handicap baloncesto|apuestas con mas probabilidades de ganar|apuestas con paypal|apuestas
con tarjeta de credito|apuestas con tarjeta de debito|apuestas consejos|apuestas copa|apuestas
copa africa|apuestas copa america|apuestas copa américa|apuestas copa argentina|apuestas
copa brasil|apuestas copa davis|apuestas copa de europa|apuestas copa
del mundo|apuestas copa del rey|apuestas copa del
rey baloncesto|apuestas copa del rey final|apuestas copa del rey futbol|apuestas copa del
rey ganador|apuestas copa del rey hoy|apuestas copa del rey pronosticos|apuestas copa
del rey pronósticos|apuestas copa europa|apuestas copa italia|apuestas copa libertadores|apuestas copa
mundial de hockey|apuestas copa rey|apuestas copa sudamericana|apuestas
corners|apuestas corners hoy|apuestas croacia argentina|apuestas cuartos eurocopa|apuestas cuotas|apuestas cuotas altas|apuestas cuotas bajas|apuestas de 1 euro|apuestas de baloncesto|apuestas de baloncesto hoy|apuestas de baloncesto nba|apuestas de
baloncesto para hoy|apuestas de beisbol|apuestas de beisbol
para hoy|apuestas de blackjack en linea|apuestas de
boxeo|apuestas de boxeo canelo|apuestas de boxeo en las vegas|apuestas de boxeo hoy|apuestas de boxeo online|apuestas de caballo|apuestas
de caballos|apuestas de caballos como funciona|apuestas de caballos como se juega|apuestas de caballos
en colombia|apuestas de caballos en españa|apuestas de caballos en linea|apuestas de caballos españa|apuestas de caballos ganador y colocado|apuestas de caballos internacionales|apuestas de caballos juegos|apuestas de caballos online|apuestas de caballos online en venezuela|apuestas de caballos por internet|apuestas de caballos
pronosticos|apuestas de caballos pronósticos|apuestas de carrera de caballos|apuestas de carreras de caballos|apuestas
de carreras de caballos online|apuestas de casino|apuestas
de casino online|apuestas de casino por internet|apuestas de champions
league|apuestas de ciclismo|apuestas de colombia|apuestas de copa america|apuestas de corners|apuestas de deportes en linea|apuestas de deportes online|apuestas de dinero|apuestas
de esports|apuestas de eurocopa|apuestas de europa league|apuestas de f1|apuestas de formula 1|apuestas de futbol|apuestas de fútbol|apuestas de futbol app|apuestas
de futbol argentina|apuestas de futbol colombia|apuestas de futbol
en colombia|apuestas de futbol en directo|apuestas de futbol en linea|apuestas de futbol en vivo|apuestas de futbol español|apuestas de futbol gratis|apuestas
de futbol hoy|apuestas de futbol mundial|apuestas de futbol online|apuestas de fútbol online|apuestas de futbol para hoy|apuestas de fútbol para hoy|apuestas de futbol
para hoy seguras|apuestas de futbol para mañana|apuestas de futbol peru|apuestas
de futbol pronosticos|apuestas de fútbol pronósticos|apuestas de futbol seguras|apuestas de futbol seguras para hoy|apuestas de futbol sin dinero|apuestas de
galgos|apuestas de galgos como ganar|apuestas
de galgos en directo|apuestas de galgos online|apuestas de galgos trucos|apuestas de golf|apuestas de hockey|apuestas
de hockey sobre hielo|apuestas de hoy|apuestas de hoy seguras|apuestas de juego|apuestas de juegos|apuestas
de juegos deportivos|apuestas de juegos online|apuestas de
la champions league|apuestas de la copa américa|apuestas de la eurocopa|apuestas de la
europa league|apuestas de la liga|apuestas de la liga bbva|apuestas
de la liga española|apuestas de la nba|apuestas de la nfl|apuestas
de la ufc|apuestas de mlb|apuestas de nba|apuestas de nba para hoy|apuestas de partidos|apuestas
de partidos de futbol|apuestas de peleas ufc|apuestas
de perros en vivo|apuestas de perros virtuales|apuestas de peru|apuestas de sistema|apuestas de sistema como funciona|apuestas de sistema explicacion|apuestas de sistema explicación|apuestas de tenis|apuestas de tenis de mesa|apuestas de
tenis en directo|apuestas de tenis hoy|apuestas de tenis para hoy|apuestas de tenis
pronosticos|apuestas de tenis seguras|apuestas de todo tipo|apuestas
de ufc|apuestas de ufc hoy|apuestas del boxeo|apuestas del clasico|apuestas del clasico real madrid barca|apuestas del
dia|apuestas del día|apuestas del dia de hoy|apuestas del dia deportivas|apuestas del dia futbol|apuestas del mundial|apuestas del partido de hoy|apuestas del real madrid|apuestas del rey|apuestas del sistema|apuestas deporte|apuestas deportes|apuestas deportiva|apuestas deportivas|apuestas deportivas 1 euro|apuestas
deportivas 10 euros gratis|apuestas deportivas 100 seguras|apuestas deportivas
1×2|apuestas deportivas android|apuestas deportivas app|apuestas deportivas apps|apuestas deportivas argentina|apuestas deportivas argentina futbol|apuestas deportivas argentina legal|apuestas deportivas atletico de madrid|apuestas deportivas
baloncesto|apuestas deportivas barca madrid|apuestas deportivas barcelona|apuestas
deportivas beisbol|apuestas deportivas bono|apuestas deportivas bono bienvenida|apuestas deportivas bono de bienvenida|apuestas deportivas bono sin deposito|apuestas deportivas
bonos de bienvenida|apuestas deportivas boxeo|apuestas deportivas caballos|apuestas deportivas calculadora|apuestas deportivas campeon liga|apuestas
deportivas casino|apuestas deportivas casino barcelona|apuestas
deportivas casino online|apuestas deportivas cerca de mi|apuestas deportivas champions league|apuestas deportivas chile|apuestas deportivas ciclismo|apuestas deportivas colombia|apuestas deportivas com|apuestas deportivas com foro|apuestas deportivas com pronosticos|apuestas deportivas combinadas|apuestas deportivas combinadas para hoy|apuestas
deportivas como se juega|apuestas deportivas comparador|apuestas deportivas con bono gratis|apuestas deportivas con bonos
gratis|apuestas deportivas con dinero ficticio|apuestas deportivas con paypal|apuestas deportivas con puntos
virtuales|apuestas deportivas consejos|apuestas
deportivas consejos para ganar|apuestas deportivas copa america|apuestas deportivas copa del
rey|apuestas deportivas copa libertadores|apuestas deportivas copa mundial|apuestas deportivas corners|apuestas deportivas cual es la mejor|apuestas deportivas cuotas altas|apuestas deportivas de baloncesto|apuestas deportivas de boxeo|apuestas deportivas
de colombia|apuestas deportivas de futbol|apuestas deportivas de nba|apuestas
deportivas de nhl|apuestas deportivas de peru|apuestas deportivas de tenis|apuestas deportivas del dia|apuestas deportivas dinero ficticio|apuestas deportivas directo|apuestas deportivas doble oportunidad|apuestas deportivas en argentina|apuestas deportivas
en chile|apuestas deportivas en colombia|apuestas
deportivas en directo|apuestas deportivas en españa|apuestas deportivas en español|apuestas deportivas en linea|apuestas deportivas en línea|apuestas deportivas en peru|apuestas deportivas
en perú|apuestas deportivas en sevilla|apuestas deportivas en uruguay|apuestas deportivas en vivo|apuestas deportivas es|apuestas deportivas es pronosticos|apuestas deportivas
españa|apuestas deportivas españolas|apuestas deportivas esports|apuestas deportivas estadisticas|apuestas deportivas estrategias|apuestas
deportivas estrategias seguras|apuestas deportivas
eurocopa|apuestas deportivas europa league|apuestas deportivas f1|apuestas deportivas faciles
de ganar|apuestas deportivas formula 1|apuestas deportivas foro|apuestas deportivas
foro futbol|apuestas deportivas foro tenis|apuestas deportivas
francia argentina|apuestas deportivas futbol|apuestas
deportivas fútbol|apuestas deportivas futbol argentino|apuestas deportivas futbol colombia|apuestas deportivas
futbol español|apuestas deportivas gana|apuestas deportivas
ganadas|apuestas deportivas ganar dinero seguro|apuestas deportivas gane|apuestas deportivas golf|apuestas
deportivas gratis|apuestas deportivas gratis con premios|apuestas deportivas
gratis hoy|apuestas deportivas gratis sin deposito|apuestas deportivas handicap|apuestas deportivas handicap asiatico|apuestas deportivas hoy|apuestas deportivas impuestos|apuestas deportivas interior argentina|apuestas deportivas
juegos olimpicos|apuestas deportivas la liga|apuestas deportivas legales|apuestas deportivas legales en colombia|apuestas deportivas libres de
impuestos|apuestas deportivas licencia españa|apuestas deportivas liga española|apuestas deportivas listado|apuestas deportivas listado clasico|apuestas deportivas madrid|apuestas
deportivas mas seguras|apuestas deportivas mejor pagadas|apuestas deportivas mejores|apuestas deportivas mejores app|apuestas deportivas mejores casas|apuestas deportivas mejores cuotas|apuestas
deportivas mejores paginas|apuestas deportivas mexico|apuestas deportivas méxico|apuestas
deportivas mlb|apuestas deportivas mlb hoy|apuestas deportivas multiples|apuestas deportivas mundial|apuestas deportivas murcia|apuestas deportivas nba|apuestas
deportivas nba hoy|apuestas deportivas nfl|apuestas deportivas
nhl|apuestas deportivas nuevas|apuestas deportivas ofertas|apuestas deportivas
online|apuestas deportivas online argentina|apuestas deportivas online chile|apuestas
deportivas online colombia|apuestas deportivas online en colombia|apuestas deportivas
online españa|apuestas deportivas online mexico|apuestas deportivas
online paypal|apuestas deportivas online peru|apuestas deportivas online por internet|apuestas deportivas
pago paypal|apuestas deportivas para ganar dinero|apuestas
deportivas para hoy|apuestas deportivas para hoy pronosticos|apuestas deportivas
partido suspendido|apuestas deportivas partidos de
hoy|apuestas deportivas paypal|apuestas deportivas peru|apuestas
deportivas perú|apuestas deportivas peru vs ecuador|apuestas
deportivas predicciones|apuestas deportivas promociones|apuestas deportivas pronostico|apuestas deportivas pronóstico|apuestas deportivas pronostico hoy|apuestas deportivas pronosticos|apuestas deportivas pronósticos|apuestas deportivas pronosticos expertos|apuestas deportivas pronosticos gratis|apuestas
deportivas pronosticos nba|apuestas deportivas pronosticos
tenis|apuestas deportivas que aceptan paypal|apuestas deportivas real madrid|apuestas deportivas regalo
bienvenida|apuestas deportivas resultado exacto|apuestas deportivas
resultados|apuestas deportivas rugby|apuestas deportivas seguras|apuestas
deportivas seguras foro|apuestas deportivas seguras hoy|apuestas
deportivas seguras para hoy|apuestas deportivas seguras telegram|apuestas deportivas sevilla|apuestas deportivas simulador eurocopa|apuestas deportivas sin deposito|apuestas deportivas sin deposito
inicial|apuestas deportivas sin dinero|apuestas deportivas sin dinero real|apuestas deportivas
sin registro|apuestas deportivas stake|apuestas
deportivas stake 10|apuestas deportivas telegram españa|apuestas deportivas tenis|apuestas deportivas tenis de mesa|apuestas deportivas tenis
foro|apuestas deportivas tenis hoy|apuestas deportivas
tips|apuestas deportivas tipster|apuestas deportivas ufc|apuestas deportivas uruguay|apuestas deportivas
valencia|apuestas deportivas valencia barcelona|apuestas deportivas venezuela|apuestas deportivas virtuales|apuestas deportivas y casino|apuestas
deportivas y casino online|apuestas deportivas.com|apuestas deportivas.com foro|apuestas deportivas.es|apuestas deportivos pronosticos|apuestas deposito minimo
1 euro|apuestas descenso a segunda|apuestas descenso a segunda b|apuestas descenso la liga|apuestas descenso primera division|apuestas descenso segunda|apuestas dia|apuestas diarias seguras|apuestas dinero|apuestas dinero ficticio|apuestas
dinero real|apuestas dinero virtual|apuestas directas|apuestas directo|apuestas directo futbol|apuestas division de honor juvenil|apuestas dnb|apuestas
doble oportunidad|apuestas doble resultado|apuestas dobles|apuestas dobles y triples|apuestas dortmund
barcelona|apuestas draft nba|apuestas draft nfl|apuestas ecuador
vs argentina|apuestas ecuador vs venezuela|apuestas egipto uruguay|apuestas
el clasico|apuestas elecciones venezuela|apuestas empate|apuestas en baloncesto|apuestas en barcelona|apuestas en beisbol|apuestas en boxeo|apuestas en caballos|apuestas
en carreras de caballos|apuestas en casino|apuestas en casino online|apuestas en casinos|apuestas
en casinos online|apuestas en chile|apuestas en ciclismo|apuestas en colombia|apuestas en colombia de futbol|apuestas en directo|apuestas en directo futbol|apuestas en directo pronosticos|apuestas en el futbol|apuestas en el tenis|apuestas en españa|apuestas en esports|apuestas
en eventos deportivos virtuales|apuestas en golf|apuestas
en juegos|apuestas en la champions league|apuestas en la eurocopa|apuestas
en la liga|apuestas en la nba|apuestas en la
nfl|apuestas en las vegas mlb|apuestas en las vegas nfl|apuestas
en linea|apuestas en línea|apuestas en linea argentina|apuestas en linea boxeo|apuestas en linea chile|apuestas en linea colombia|apuestas en línea de fútbol|apuestas en linea deportivas|apuestas en linea españa|apuestas en linea estados unidos|apuestas en linea futbol|apuestas
en linea mexico|apuestas en línea méxico|apuestas
en linea mundial|apuestas en linea peru|apuestas en linea usa|apuestas en los esports|apuestas en madrid|apuestas en méxico|apuestas en mexico online|apuestas en nba|apuestas en partidos de futbol|apuestas en partidos de futbol en vivo|apuestas en partidos de tenis en directo|apuestas en perú|apuestas en sevilla|apuestas en sistema|apuestas en stake|apuestas en tenis|apuestas en tenis
de mesa|apuestas en valencia|apuestas en vivo|apuestas en vivo
argentina|apuestas en vivo casino|apuestas
en vivo futbol|apuestas en vivo fútbol|apuestas en vivo
nba|apuestas en vivo peru|apuestas en vivo tenis|apuestas en vivo ufc|apuestas equipo mbappe|apuestas equipos de futbol|apuestas españa|apuestas españa alemania|apuestas españa alemania eurocopa|apuestas españa croacia|apuestas españa eurocopa|apuestas españa francia|apuestas españa francia
eurocopa|apuestas españa gana el mundial|apuestas españa gana eurocopa|apuestas españa gana mundial|apuestas españa georgia|apuestas
españa holanda|apuestas españa inglaterra|apuestas españa inglaterra cuotas|apuestas españa inglaterra eurocopa|apuestas españa italia|apuestas españa mundial|apuestas españa paises
bajos|apuestas español|apuestas español oviedo|apuestas espanyol barcelona|apuestas espanyol betis|apuestas espanyol
villarreal|apuestas esport|apuestas esports|apuestas esports
colombia|apuestas esports españa|apuestas esports fifa|apuestas esports gratis|apuestas esports lol|apuestas esports peru|apuestas esports valorant|apuestas estadisticas|apuestas
estrategias|apuestas euro|apuestas euro copa|apuestas eurocopa|apuestas
eurocopa campeon|apuestas eurocopa españa|apuestas eurocopa favoritos|apuestas eurocopa
femenina|apuestas eurocopa final|apuestas eurocopa ganador|apuestas eurocopa
hoy|apuestas eurocopa sub 21|apuestas euroliga baloncesto|apuestas
euroliga pronosticos|apuestas europa league|apuestas europa league hoy|apuestas europa league pronosticos|apuestas europa league pronósticos|apuestas euros|apuestas f1 abu dhabi|apuestas f1 bahrein|apuestas f1 canada|apuestas f1 china|apuestas f1 cuotas|apuestas f1 hoy|apuestas f1 las vegas|apuestas f1 miami|apuestas f1 monaco|apuestas faciles de ganar|apuestas fáciles
de ganar|apuestas faciles para ganar|apuestas favoritas|apuestas favorito champions|apuestas favoritos champions|apuestas
favoritos eurocopa|apuestas favoritos mundial|apuestas fc barcelona|apuestas final
champions cuotas|apuestas final champions league|apuestas final champions peru|apuestas final copa|apuestas final copa america|apuestas final copa de europa|apuestas final copa del
rey|apuestas final copa europa|apuestas final copa libertadores|apuestas final copa
rey|apuestas final de copa|apuestas final de copa del rey|apuestas final del mundial|apuestas final euro|apuestas final eurocopa|apuestas final europa league|apuestas final libertadores|apuestas final mundial|apuestas final nba|apuestas final rugby|apuestas final uefa europa league|apuestas final.mundial|apuestas finales de conferencia nfl|apuestas finales nba|apuestas fiorentina betis|apuestas
formula|apuestas formula 1|apuestas fórmula 1|apuestas fórmula 1 pronósticos|apuestas formula uno|apuestas foro|apuestas foro nba|apuestas francia argentina|apuestas francia
españa|apuestas futbol|apuestas fútbol|apuestas futbol americano|apuestas futbol
americano nfl|apuestas futbol argentina|apuestas futbol argentino|apuestas
futbol champions league|apuestas futbol chile|apuestas futbol colombia|apuestas futbol consejos|apuestas futbol en directo|apuestas fútbol
en directo|apuestas futbol en vivo|apuestas fútbol en vivo|apuestas futbol españa|apuestas futbol español|apuestas fútbol español|apuestas futbol eurocopa|apuestas futbol femenino|apuestas futbol foro|apuestas futbol gratis|apuestas futbol hoy|apuestas fútbol hoy|apuestas futbol juegos olimpicos|apuestas futbol mexico|apuestas futbol
mundial|apuestas futbol online|apuestas futbol para hoy|apuestas
futbol peru|apuestas futbol pronosticos|apuestas futbol
sala|apuestas futbol telegram|apuestas futbol virtual|apuestas galgos|apuestas galgos en directo|apuestas galgos
hoy|apuestas galgos online|apuestas galgos pronosticos|apuestas galgos trucos|apuestas gana|apuestas gana colombia|apuestas gana resultados|apuestas ganadas|apuestas ganadas hoy|apuestas ganador champions league|apuestas
ganador copa america|apuestas ganador copa del rey|apuestas ganador copa del
rey baloncesto|apuestas ganador copa libertadores|apuestas ganador de la eurocopa|apuestas ganador de la liga|apuestas ganador del mundial|apuestas ganador eurocopa|apuestas ganador europa
league|apuestas ganador f1|apuestas ganador la liga|apuestas
ganador liga española|apuestas ganador mundial|apuestas ganador mundial
baloncesto|apuestas ganador mundial f1|apuestas ganador nba|apuestas ganadores eurocopa|apuestas ganadores mundial|apuestas ganar champions|apuestas
ganar eurocopa|apuestas ganar liga|apuestas ganar mundial|apuestas ganar nba|apuestas getafe
valencia|apuestas ghana uruguay|apuestas girona|apuestas girona athletic|apuestas girona betis|apuestas girona campeon de liga|apuestas girona campeon liga|apuestas girona gana la liga|apuestas girona real madrid|apuestas girona real sociedad|apuestas
goleador eurocopa|apuestas goleadores eurocopa|apuestas goles asiaticos|apuestas golf|apuestas golf masters|apuestas golf pga|apuestas
granada barcelona|apuestas grand slam de tenis|apuestas gratis|apuestas
gratis casino|apuestas gratis con premios|apuestas gratis hoy|apuestas gratis para hoy|apuestas gratis por registro|apuestas gratis puntos|apuestas gratis regalos|apuestas gratis sin deposito|apuestas
gratis sin depósito|apuestas gratis sin ingreso|apuestas gratis sports|apuestas
gratis y ganar premios|apuestas grupo a eurocopa|apuestas grupos eurocopa|apuestas handicap|apuestas handicap asiatico|apuestas handicap baloncesto|apuestas handicap como funciona|apuestas handicap nba|apuestas handicap nfl|apuestas hipicas online|apuestas
hípicas online|apuestas hipicas venezuela|apuestas hockey|apuestas hockey hielo|apuestas hockey patines|apuestas hockey sobre hielo|apuestas holanda argentina|apuestas holanda vs argentina|apuestas hoy|apuestas hoy champions|apuestas hoy futbol|apuestas hoy nba|apuestas hoy pronosticos|apuestas
hoy seguras|apuestas impuestos|apuestas inglaterra paises bajos|apuestas inter barca|apuestas inter barcelona|apuestas
juego|apuestas juegos|apuestas juegos en linea|apuestas juegos olimpicos|apuestas juegos olímpicos|apuestas juegos olimpicos baloncesto|apuestas juegos online|apuestas juegos virtuales|apuestas jugador sevilla|apuestas jugadores nba|apuestas kings league americas|apuestas la liga|apuestas la liga española|apuestas la liga hoy|apuestas la
liga santander|apuestas las vegas mlb|apuestas las vegas nba|apuestas las vegas nfl|apuestas league of legends mundial|apuestas legal|apuestas legales|apuestas legales en colombia|apuestas legales en españa|apuestas legales en estados
unidos|apuestas legales españa|apuestas leganes betis|apuestas libertadores|apuestas licencia|apuestas liga 1
peru|apuestas liga argentina|apuestas liga bbva
pronosticos|apuestas liga de campeones|apuestas liga
de campeones de baloncesto|apuestas liga de campeones de hockey|apuestas liga españa|apuestas liga española|apuestas
liga santander pronosticos|apuestas ligas de futbol|apuestas linea|apuestas linea de gol|apuestas liverpool barcelona|apuestas liverpool real madrid|apuestas lol mundial|apuestas madrid|apuestas madrid arsenal|apuestas madrid atletico|apuestas madrid atletico champions|apuestas
madrid barca|apuestas madrid barça|apuestas madrid barca hoy|apuestas madrid barca supercopa|apuestas madrid barcelona|apuestas
madrid barsa|apuestas madrid bayern|apuestas madrid betis|apuestas madrid
borussia|apuestas madrid campeon champions|apuestas madrid celta|apuestas madrid city|apuestas madrid dortmund|apuestas madrid gana la liga|apuestas
madrid gana liga|apuestas madrid hoy|apuestas madrid liverpool|apuestas madrid
osasuna|apuestas madrid sevilla|apuestas madrid valencia|apuestas madrid vs arsenal|apuestas madrid vs barcelona|apuestas mallorca
osasuna|apuestas mallorca real sociedad|apuestas manchester athletic|apuestas manchester city
real madrid|apuestas mas faciles de ganar|apuestas mas seguras|apuestas mas seguras para hoy|apuestas masters de golf|apuestas masters de
tenis|apuestas maximo goleador eurocopa|apuestas maximo goleador mundial|apuestas
mejor jugador eurocopa|apuestas mejores
casinos online|apuestas mexico|apuestas méxico|apuestas mexico polonia|apuestas méxico
polonia|apuestas mlb|apuestas mlb hoy|apuestas mlb las vegas|apuestas mlb para hoy|apuestas mlb pronosticos|apuestas mlb
usa|apuestas mma ufc|apuestas momios|apuestas multiples|apuestas múltiples|apuestas multiples como funcionan|apuestas multiples el gordo|apuestas multiples futbol|apuestas mundial|apuestas mundial 2026|apuestas mundial
baloncesto|apuestas mundial balonmano|apuestas mundial brasil|apuestas mundial campeon|apuestas mundial ciclismo|apuestas mundial clubes|apuestas mundial de
baloncesto|apuestas mundial de ciclismo|apuestas mundial de
clubes|apuestas mundial de futbol|apuestas mundial de fútbol|apuestas mundial de rugby|apuestas mundial f1|apuestas mundial favoritos|apuestas mundial femenino|apuestas
mundial formula 1|apuestas mundial futbol|apuestas mundial ganador|apuestas mundial
lol|apuestas mundial moto gp|apuestas mundial motogp|apuestas mundial rugby|apuestas mundial sub 17|apuestas mundiales|apuestas mundialistas|apuestas mvp eurocopa|apuestas mvp nba|apuestas mvp nfl|apuestas nacionales de colombia|apuestas nba|apuestas nba all star|apuestas nba campeon|apuestas nba
consejos|apuestas nba esta noche|apuestas nba finals|apuestas nba gratis|apuestas
nba hoy|apuestas nba hoy jugadores|apuestas nba hoy pronosticos|apuestas nba para
hoy|apuestas nba playoffs|apuestas nba pronosticos|apuestas nba pronósticos|apuestas
nba pronosticos hoy|apuestas nba tipster|apuestas nfl|apuestas nfl hoy|apuestas nfl las vegas|apuestas
nfl playoffs|apuestas nfl pronosticos|apuestas nfl pronósticos|apuestas nfl semana 4|apuestas nfl
super bowl|apuestas nhl|apuestas nhl pronosticos|apuestas octavos eurocopa|apuestas ofertas|apuestas online|apuestas online argentina|apuestas online argentina legal|apuestas online bono|apuestas online bono
bienvenida|apuestas online boxeo|apuestas online caballos|apuestas online carreras de caballos|apuestas online casino|apuestas online champions league|apuestas online chile|apuestas online ciclismo|apuestas online colombia|apuestas online comparativa|apuestas online con paypal|apuestas online
de caballos|apuestas online deportivas|apuestas online en argentina|apuestas online en peru|apuestas online espana|apuestas online españa|apuestas online esports|apuestas online foro|apuestas online futbol|apuestas
online futbol españa|apuestas online golf|apuestas online gratis|apuestas online gratis sin deposito|apuestas online juegos|apuestas online mexico|apuestas online mma|apuestas online movil|apuestas online nba|apuestas online net|apuestas online nuevas|apuestas online opiniones|apuestas online paypal|apuestas online peru|apuestas
online seguras|apuestas online sin dinero|apuestas online sin registro|apuestas online tenis|apuestas online ufc|apuestas
online uruguay|apuestas online venezuela|apuestas open britanico golf|apuestas osasuna athletic|apuestas osasuna barcelona|apuestas osasuna real madrid|apuestas osasuna sevilla|apuestas osasuna valencia|apuestas over|apuestas over 2.5|apuestas over under|apuestas paginas|apuestas
pago anticipado|apuestas paises bajos ecuador|apuestas paises bajos inglaterra|apuestas países bajos
qatar|apuestas para boxeo|apuestas para champions league|apuestas para el clasico|apuestas para el dia de hoy|apuestas para el mundial|apuestas
para el partido de hoy|apuestas para eurocopa|apuestas para europa
league|apuestas para futbol|apuestas para ganar|apuestas para
ganar dinero|apuestas para ganar dinero facil|apuestas para ganar en la ruleta|apuestas para ganar la champions|apuestas para ganar
la eurocopa|apuestas para ganar la europa league|apuestas para ganar la liga|apuestas para
ganar siempre|apuestas para hacer|apuestas para hoy|apuestas para hoy de futbol|apuestas para hoy europa league|apuestas para hoy futbol|apuestas para juegos|apuestas para la champions league|apuestas para la copa del rey|apuestas para la eurocopa|apuestas para
la europa league|apuestas para la final de
la eurocopa|apuestas para la nba hoy|apuestas para los partidos de hoy|apuestas para partidos de hoy|apuestas para ufc|apuestas partido|apuestas partido aplazado|apuestas partido champions|apuestas partido colombia|apuestas
partido españa marruecos|apuestas partido mundial|apuestas partido suspendido|apuestas
partidos|apuestas partidos champions league|apuestas partidos csgo|apuestas partidos
de futbol|apuestas partidos de futbol hoy|apuestas partidos
de hoy|apuestas partidos eurocopa|apuestas partidos futbol|apuestas partidos hoy|apuestas partidos mundial|apuestas
paypal|apuestas peleas de boxeo|apuestas peru|apuestas perú|apuestas peru brasil|apuestas peru chile|apuestas peru paraguay|apuestas peru
uruguay|apuestas peru vs chile|apuestas peru vs colombia|apuestas pichichi
eurocopa|apuestas plataforma|apuestas playoff|apuestas playoff ascenso|apuestas playoff ascenso a primera|apuestas playoff nba|apuestas playoff segunda|apuestas playoff
segunda b|apuestas playoffs nba|apuestas playoffs nfl|apuestas polonia argentina|apuestas por argentina|apuestas por
internet mexico|apuestas por internet para ganar dinero|apuestas por paypal|apuestas por
ronda boxeo|apuestas por sistema|apuestas portugal uruguay|apuestas
pre partido|apuestas predicciones|apuestas predicciones futbol|apuestas
primera division|apuestas primera division españa|apuestas promociones|apuestas pronostico|apuestas pronosticos|apuestas pronosticos deportivos|apuestas pronosticos deportivos tenis|apuestas
pronosticos futbol|apuestas pronosticos gratis|apuestas pronosticos nba|apuestas pronosticos tenis|apuestas prorroga|apuestas psg barca|apuestas psg
barcelona|apuestas puntos por tarjetas|apuestas puntos tarjetas|apuestas que aceptan paypal|apuestas que es handicap|apuestas que puedes hacer con tu novia|apuestas que siempre ganaras|apuestas que significa|apuestas quien bajara a
segunda|apuestas quién bajara a segunda|apuestas quien gana el mundial|apuestas quien gana
eurocopa|apuestas quien gana la champions|apuestas quien gana la
eurocopa|apuestas quien gana la liga|apuestas quien ganara el mundial|apuestas quién ganará el mundial|apuestas quien ganara la champions|apuestas quien ganara la eurocopa|apuestas quien ganara la
liga|apuestas rayo barcelona|apuestas real madrid|apuestas
real madrid arsenal|apuestas real madrid athletic|apuestas
real madrid atletico|apuestas real madrid atletico
champions|apuestas real madrid atletico de madrid|apuestas
real madrid atlético de madrid|apuestas real madrid atletico madrid|apuestas real madrid barcelona|apuestas real madrid
bayern|apuestas real madrid betis|apuestas real madrid borussia|apuestas real
madrid campeon champions|apuestas real madrid celta|apuestas real madrid champions|apuestas
real madrid city|apuestas real madrid girona|apuestas real madrid hoy|apuestas real madrid liverpool|apuestas real madrid manchester city|apuestas real madrid osasuna|apuestas
real madrid real sociedad|apuestas real madrid valencia|apuestas real madrid villarreal|apuestas real madrid vs arsenal|apuestas real madrid vs
atletico|apuestas real madrid vs atlético|apuestas real madrid vs atletico
madrid|apuestas real madrid vs barcelona|apuestas real madrid vs betis|apuestas
real madrid vs sevilla|apuestas real madrid vs valencia|apuestas
real sociedad|apuestas real sociedad athletic|apuestas
real sociedad barcelona|apuestas real sociedad
betis|apuestas real sociedad psg|apuestas real sociedad
real madrid|apuestas real sociedad valencia|apuestas
recomendadas hoy|apuestas regalo de bienvenida|apuestas registro|apuestas resultado exacto|apuestas resultados|apuestas resultados eurocopa|apuestas retirada tenis|apuestas roma barcelona|apuestas roma sevilla|apuestas rugby|apuestas rugby mundial|apuestas rugby world
cup|apuestas ruleta seguras|apuestas segunda|apuestas segunda b|apuestas
segunda division|apuestas segunda división|apuestas segunda division b|apuestas segunda division españa|apuestas seguras|apuestas
seguras baloncesto|apuestas seguras calculadora|apuestas seguras en la ruleta|apuestas seguras eurocopa|apuestas seguras foro|apuestas seguras futbol|apuestas seguras futbol hoy|apuestas seguras gratis|apuestas seguras
hoy|apuestas seguras hoy futbol|apuestas seguras nba|apuestas seguras nba hoy|apuestas
seguras para este fin de semana|apuestas seguras para
ganar dinero|apuestas seguras para hoy|apuestas seguras para hoy fútbol|apuestas seguras
para hoy pronósticos|apuestas seguras para mañana|apuestas seguras ruleta|apuestas seguras telegram|apuestas seguras
tenis|apuestas semifinales eurocopa|apuestas senegal paises bajos|apuestas sevilla|apuestas sevilla
athletic|apuestas sevilla atletico de madrid|apuestas
sevilla barcelona|apuestas sevilla betis|apuestas sevilla campeon liga|apuestas
sevilla celta|apuestas sevilla gana la liga|apuestas sevilla girona|apuestas
sevilla inter|apuestas sevilla jugador|apuestas sevilla juventus|apuestas sevilla leganes|apuestas sevilla madrid|apuestas sevilla
manchester united|apuestas sevilla osasuna|apuestas sevilla real madrid|apuestas sevilla real sociedad|apuestas sevilla
roma|apuestas sevilla valencia|apuestas significa|apuestas simples ejemplos|apuestas simples o combinadas|apuestas sin deposito|apuestas sin deposito
inicial|apuestas sin deposito minimo|apuestas sin dinero|apuestas sin dinero
real|apuestas sin empate|apuestas sin empate que significa|apuestas sin ingreso minimo|apuestas sin registro|apuestas sistema|apuestas
sistema calculadora|apuestas sistema como funciona|apuestas sistema trixie|apuestas
sociedad|apuestas sorteo copa del rey|apuestas stake|apuestas stake 10|apuestas stake 10 hoy|apuestas super bowl favorito|apuestas super rugby|apuestas supercopa españa|apuestas superliga argentina|apuestas tarjeta
roja|apuestas tarjetas|apuestas tarjetas amarillas|apuestas tenis|apuestas
tenis atp|apuestas tenis consejos|apuestas tenis copa davis|apuestas tenis
de mesa|apuestas tenis de mesa pronosticos|apuestas tenis
en vivo|apuestas tenis femenino|apuestas tenis hoy|apuestas tenis itf|apuestas tenis pronosticos|apuestas tenis pronósticos|apuestas tenis retirada|apuestas tenis roland garros|apuestas tenis seguras|apuestas
tenis wimbledon|apuestas tenis wta|apuestas tercera division|apuestas tercera
division españa|apuestas tipos|apuestas tips|apuestas tipster|apuestas tipster para hoy|apuestas topuria holloway
cuotas|apuestas torneos de golf|apuestas torneos de tenis|apuestas
trucos|apuestas uefa champions league|apuestas uefa europa league|apuestas ufc|apuestas
ufc chile|apuestas ufc como funciona|apuestas ufc hoy|apuestas ufc ilia topuria|apuestas ufc online|apuestas ufc pronósticos|apuestas ufc telegram|apuestas
ufc topuria|apuestas under over|apuestas unionistas
villarreal|apuestas uruguay|apuestas uruguay colombia|apuestas uruguay
corea|apuestas uruguay vs colombia|apuestas us open golf|apuestas us open tenis|apuestas valencia|apuestas valencia
barcelona|apuestas valencia betis|apuestas valencia madrid|apuestas valencia real madrid|apuestas valladolid barcelona|apuestas valladolid valencia|apuestas valor app|apuestas valor en directo|apuestas valor galgos|apuestas venezuela|apuestas venezuela argentina|apuestas venezuela bolivia|apuestas venezuela ecuador|apuestas villarreal|apuestas villarreal
athletic|apuestas villarreal barcelona|apuestas villarreal bayern|apuestas villarreal betis|apuestas villarreal
liverpool|apuestas villarreal manchester|apuestas villarreal manchester united|apuestas villarreal vs real madrid|apuestas virtuales|apuestas virtuales colombia|apuestas virtuales futbol|apuestas virtuales sin dinero|apuestas vivo|apuestas
vuelta a españa|apuestas vuelta españa|apuestas william hill partidos de hoy|apuestas y casino|apuestas y casinos|apuestas y juegos de azar|apuestas y pronosticos|apuestas y pronosticos de futbol|apuestas y pronosticos
deportivos|apuestas y resultados|apuestas-deportivas|apuestas-deportivas.es pronosticos|arbitro nba apuestas|argentina apuestas|argentina colombia apuestas|argentina croacia
apuestas|argentina francia apuestas|argentina mexico
apuestas|argentina peru apuestas|argentina uruguay apuestas|argentina vs bolivia apuestas|argentina vs chile apuestas|argentina
vs colombia apuestas|argentina vs francia apuestas|argentina vs.
colombia apuestas|asi se gana en las apuestas deportivas|asiatico apuestas|asiatico en apuestas|asiaticos apuestas|athletic barcelona apuestas|athletic manchester united apuestas|athletic osasuna apuestas|athletic real madrid apuestas|atletico barcelona apuestas|atletico
de madrid apuestas|atlético de madrid apuestas|atletico de madrid real madrid apuestas|atletico de madrid vs
barcelona apuestas|atletico madrid real madrid apuestas|atletico madrid vs real madrid apuestas|atletico real madrid apuestas|atletico vs real
madrid apuestas|avisador de cuotas apuestas|bajada de cuotas apuestas|baloncesto apuestas|barbastro barcelona apuestas|barca apuestas|barca bayern apuestas|barca inter
apuestas|barca madrid apuestas|barça madrid apuestas|barca vs
atletico apuestas|barca vs madrid apuestas|barca
vs real madrid apuestas|barcelona – real madrid apuestas|barcelona apuestas|barcelona atletico apuestas|barcelona atletico de madrid apuestas|barcelona atletico madrid apuestas|barcelona betis apuestas|barcelona casa de apuestas|barcelona inter apuestas|barcelona psg apuestas|barcelona
real madrid apuestas|barcelona real sociedad apuestas|barcelona sevilla apuestas|barcelona valencia apuestas|barcelona vs athletic bilbao apuestas|barcelona vs atlético madrid apuestas|barcelona vs
betis apuestas|barcelona vs celta de vigo apuestas|barcelona vs espanyol apuestas|barcelona
vs girona apuestas|barcelona vs madrid apuestas|barcelona vs real madrid apuestas|barcelona
vs real sociedad apuestas|barcelona vs sevilla apuestas|barcelona
vs villarreal apuestas|base de datos cuotas apuestas deportivas|bayern real madrid apuestas|beisbol apuestas|best america apuestas|bet apuestas chile|bet apuestas en vivo|betis – chelsea apuestas|betis
apuestas|betis barcelona apuestas|betis chelsea apuestas|betis madrid apuestas|betis
sevilla apuestas|betsson tu sitio de apuestas online|blog apuestas baloncesto|blog apuestas ciclismo|blog apuestas nba|blog apuestas tenis|blog de
apuestas de tenis|bono apuestas|bono apuestas deportivas|bono apuestas deportivas sin deposito|bono apuestas gratis|bono apuestas gratis sin deposito|bono apuestas sin deposito|bono bienvenida apuestas|bono
bienvenida apuestas deportivas|bono bienvenida apuestas españa|bono bienvenida apuestas sin deposito|bono bienvenida apuestas sin depósito|bono bienvenida casa apuestas|bono bienvenida casa de apuestas|bono bienvenida marca apuestas|bono casa apuestas|bono casa de apuestas|bono casa de apuestas sin ingreso|bono
casas de apuestas|bono de apuestas|bono de apuestas gratis sin deposito|bono de
bienvenida apuestas|bono de bienvenida apuestas deportivas|bono
de bienvenida casa de apuestas|bono de bienvenida casas de apuestas|bono de casas de apuestas|bono
de registro apuestas|bono de registro apuestas
deportivas|bono de registro casa de apuestas|bono gratis apuestas|bono marca apuestas|bono por
registro apuestas|bono por registro apuestas deportivas|bono por registro casa de apuestas|bono registro apuestas|bono sin deposito apuestas|bono sin depósito apuestas|bono sin deposito apuestas deportivas|bono sin depósito apuestas
deportivas|bono sin deposito casa de apuestas|bono sin deposito marca apuestas|bono sin ingreso apuestas|bono sin ingreso apuestas deportivas|bonos apuestas|bonos apuestas colombia|bonos apuestas deportivas|bonos apuestas deportivas sin deposito|bonos apuestas gratis|bonos apuestas sin deposito|bonos apuestas sin depósito|bonos bienvenida apuestas|bonos bienvenida casas apuestas|bonos bienvenida
casas de apuestas|bonos casa de apuestas|bonos casas apuestas|bonos
casas de apuestas|bonos casas de apuestas
colombia|bonos casas de apuestas deportivas|bonos
casas de apuestas españa|bonos casas de apuestas nuevas|bonos casas
de apuestas sin deposito|bonos casas de apuestas sin depósito|bonos de apuestas|bonos de apuestas deportivas|bonos de apuestas
gratis|bonos de apuestas sin deposito|bonos
de bienvenida apuestas|bonos de bienvenida apuestas deportivas|bonos de bienvenida casa de apuestas|bonos de bienvenida
casas de apuestas|bonos de bienvenida de casas de apuestas|bonos de bienvenida en casas de apuestas|bonos de casas
de apuestas|bonos de casas de apuestas sin deposito|bonos en casa de apuestas|bonos en casas de apuestas sin deposito|bonos
gratis apuestas|bonos gratis apuestas deportivas|bonos
gratis casas de apuestas|bonos gratis sin deposito apuestas|bonos paginas de apuestas|bonos registro
casas de apuestas|bonos sin deposito apuestas|bonos
sin depósito apuestas|bonos sin deposito apuestas deportivas|bonos sin deposito casas de
apuestas|bot de apuestas deportivas gratis|boxeo apuestas|brasil colombia apuestas|brasil peru apuestas|brasil vs colombia apuestas|buenas apuestas para hoy|buscador cuotas apuestas|buscador de apuestas seguras|buscador de cuotas apuestas|buscador de cuotas de apuestas|buscar apuestas seguras|caballos
apuestas|calculador de apuestas|calculador de cuotas apuestas|calculadora apuestas|calculadora apuestas
combinadas|calculadora apuestas de sistema|calculadora
apuestas deportivas|calculadora apuestas deportivas seguras|calculadora
apuestas multiples|calculadora apuestas segura|calculadora apuestas
seguras|calculadora apuestas sistema|calculadora apuestas yankee|calculadora
arbitraje apuestas|calculadora cubrir apuestas|calculadora cuotas
apuestas|calculadora de apuestas|calculadora de apuestas combinadas|calculadora de apuestas de futbol|calculadora de
apuestas de sistema|calculadora de apuestas deportivas|calculadora de apuestas multiples|calculadora de apuestas seguras|calculadora de apuestas sistema|calculadora de apuestas surebets|calculadora de arbitraje apuestas|calculadora de cuotas apuestas|calculadora de cuotas
de apuestas|calculadora para apuestas deportivas|calculadora poisson apuestas|calculadora poisson apuestas deportivas|calculadora poisson para apuestas|calculadora
scalping apuestas deportivas|calculadora sistema
apuestas|calculadora stake apuestas|calculadora trading apuestas|calcular apuestas|calcular apuestas deportivas|calcular apuestas
futbol|calcular apuestas sistema|calcular cuotas apuestas|calcular cuotas apuestas combinadas|calcular
cuotas apuestas deportivas|calcular cuotas de apuestas|calcular
ganancias apuestas deportivas|calcular momios apuestas|calcular probabilidad cuota apuestas|calcular stake apuestas|calcular unidades apuestas|calcular yield apuestas|calculo de apuestas|calculo de
apuestas deportivas|cambio de cuotas apuestas|campeon champions apuestas|campeon eurocopa apuestas|campeon liga apuestas|campeon nba apuestas|canales de
apuestas gratis|carrera de caballos apuestas|carrera de caballos apuestas juego|carrera de
caballos con apuestas|carrera de galgos apuestas|carreras de caballos apuestas|carreras de caballos apuestas online|carreras de caballos con apuestas|carreras de caballos juegos de apuestas|carreras
de galgos apuestas|carreras de galgos apuestas online|carreras de galgos apuestas trucos|carreras galgos apuestas|casa apuestas argentina|casa apuestas atletico de madrid|casa apuestas barcelona|casa apuestas betis|casa
apuestas bono bienvenida|casa apuestas bono gratis|casa apuestas bono sin deposito|casa apuestas
cerca de mi|casa apuestas chile|casa apuestas colombia|casa apuestas
con mejores cuotas|casa apuestas deportivas|casa apuestas españa|casa apuestas española|casa
apuestas eurocopa|casa apuestas futbol|casa apuestas mejores
cuotas|casa apuestas mundial|casa apuestas nueva|casa apuestas nuevas|casa apuestas online|casa apuestas peru|casa apuestas valencia|casa de apuestas|casa de apuestas 10 euros
gratis|casa de apuestas argentina|casa de apuestas atletico de madrid|casa de
apuestas baloncesto|casa de apuestas barcelona|casa de apuestas beisbol|casa de apuestas betis|casa de apuestas bono|casa de apuestas bono bienvenida|casa de apuestas bono de
bienvenida|casa de apuestas bono gratis|casa de apuestas
bono por registro|casa de apuestas bono sin deposito|casa de apuestas boxeo|casa de
apuestas caballos|casa de apuestas carreras de caballos|casa de apuestas cerca de mi|casa de apuestas cerca de mí|casa de apuestas champions
league|casa de apuestas chile|casa de apuestas
ciclismo|casa de apuestas colombia|casa de apuestas con bono de bienvenida|casa de apuestas con bono sin deposito|casa de apuestas
con cuotas mas altas|casa de apuestas con esports|casa de apuestas con las mejores
cuotas|casa de apuestas con licencia en españa|casa de apuestas con mejores cuotas|casa
de apuestas con pago anticipado|casa de apuestas con paypal|casa de apuestas
copa america|casa de apuestas de caballos|casa
de apuestas de colombia|casa de apuestas de españa|casa de apuestas de futbol|casa de apuestas de fútbol|casa de apuestas de futbol peru|casa de
apuestas de peru|casa de apuestas del madrid|casa de apuestas del
real madrid|casa de apuestas deportivas|casa de apuestas deportivas cerca de mi|casa de apuestas deportivas en argentina|casa
de apuestas deportivas en chile|casa de apuestas
deportivas en colombia|casa de apuestas deportivas en españa|casa
de apuestas deportivas en madrid|casa de apuestas deportivas españa|casa
de apuestas deportivas españolas|casa de apuestas deportivas madrid|casa de apuestas deportivas
mexico|casa de apuestas deportivas online|casa de
apuestas deportivas peru|casa de apuestas deposito 5 euros|casa de apuestas deposito minimo|casa de apuestas
deposito minimo 1 euro|casa de apuestas depósito mínimo 1
euro|casa de apuestas en españa|casa de apuestas en linea|casa
de apuestas en madrid|casa de apuestas en perú|casa de apuestas en vivo|casa de apuestas españa|casa de apuestas españa inglaterra|casa de
apuestas española|casa de apuestas españolas|casa de apuestas esports|casa de apuestas eurocopa|casa de apuestas
europa league|casa de apuestas f1|casa de apuestas
formula 1|casa de apuestas futbol|casa de apuestas ingreso minimo|casa de apuestas ingreso minimo 1 euro|casa de apuestas ingreso mínimo 1 euro|casa
de apuestas legales|casa de apuestas legales en colombia|casa de apuestas legales en españa|casa de apuestas libertadores|casa
de apuestas liga española|casa de apuestas madrid|casa de apuestas mas segura|casa de apuestas mejores|casa de
apuestas méxico|casa de apuestas minimo 5 euros|casa de apuestas mlb|casa
de apuestas mundial|casa de apuestas nba|casa de apuestas nfl|casa de apuestas nueva|casa de apuestas nuevas|casa de apuestas oficial del real madrid|casa de apuestas oficial real madrid|casa de apuestas online|casa de apuestas online argentina|casa de
apuestas online chile|casa de apuestas online españa|casa de apuestas online mexico|casa de apuestas online paraguay|casa de apuestas online peru|casa de apuestas online
usa|casa de apuestas online venezuela|casa de apuestas pago anticipado|casa
de apuestas para boxeo|casa de apuestas para ufc|casa de apuestas peru|casa
de apuestas perú|casa de apuestas peru online|casa de
apuestas por paypal|casa de apuestas promociones|casa de apuestas que
regalan dinero|casa de apuestas real madrid|casa de apuestas regalo de bienvenida|casa de apuestas sevilla|casa de apuestas sin dinero|casa de apuestas sin ingreso minimo|casa
de apuestas sin licencia en españa|casa de apuestas sin minimo de ingreso|casa de apuestas stake|casa de apuestas tenis|casa
de apuestas ufc|casa de apuestas valencia|casa de apuestas venezuela|casa de apuestas
virtuales|casa de apuestas vive la suerte|casa oficial de apuestas del
real madrid|casas apuestas asiaticas|casas apuestas bono sin deposito|casas apuestas bonos sin deposito|casas apuestas caballos|casas apuestas chile|casas apuestas
ciclismo|casas apuestas con licencia|casas apuestas con licencia en españa|casas apuestas deportivas|casas apuestas deportivas colombia|casas
apuestas deportivas españa|casas apuestas deportivas españolas|casas apuestas deportivas nuevas|casas apuestas españa|casas apuestas españolas|casas apuestas esports|casas apuestas eurocopa|casas apuestas golf|casas
apuestas ingreso minimo 5 euros|casas apuestas legales|casas apuestas legales españa|casas apuestas licencia|casas apuestas licencia españa|casas apuestas
mexico|casas apuestas mundial|casas apuestas nba|casas apuestas nuevas|casas apuestas nuevas españa|casas apuestas
ofertas|casas apuestas online|casas apuestas paypal|casas apuestas peru|casas apuestas sin licencia|casas apuestas tenis|casas asiaticas apuestas|casas de apuestas|casas de apuestas 5 euros|casas de apuestas app|casas de apuestas argentinas|casas de
apuestas asiaticas|casas de apuestas baloncesto|casas
de apuestas barcelona|casas de apuestas bono bienvenida|casas de apuestas bono
de bienvenida|casas de apuestas bono por registro|casas de apuestas
bono sin deposito|casas de apuestas bono sin ingreso|casas de apuestas bonos|casas de
apuestas bonos de bienvenida|casas de apuestas bonos gratis|casas de apuestas bonos
sin deposito|casas de apuestas boxeo|casas de apuestas caballos|casas de apuestas carreras de caballos|casas
de apuestas casino|casas de apuestas casino online|casas
de apuestas cerca de mi|casas de apuestas champions league|casas
de apuestas chile|casas de apuestas ciclismo|casas de apuestas colombia|casas de apuestas com|casas de apuestas con app|casas de apuestas con apuestas
gratis|casas de apuestas con bono|casas de apuestas con bono
de bienvenida|casas de apuestas con bono de registro|casas de
apuestas con bono por registro|casas de apuestas con bono
sin deposito|casas de apuestas con bonos|casas de apuestas con bonos gratis|casas de apuestas con bonos sin deposito|casas de apuestas con deposito
minimo|casas de apuestas con esports|casas de apuestas con handicap asiatico|casas de
apuestas con licencia|casas de apuestas con licencia en españa|casas de apuestas con licencia españa|casas de apuestas con licencia española|casas de apuestas con mejores cuotas|casas de apuestas con pago anticipado|casas
de apuestas con paypal|casas de apuestas con paypal en perú|casas de apuestas con promociones|casas
de apuestas con ruleta en vivo|casas de apuestas copa del
rey|casas de apuestas de caballos|casas de apuestas de
españa|casas de apuestas de futbol|casas de apuestas de fútbol|casas de apuestas de
peru|casas de apuestas deportivas|casas de apuestas deportivas asiaticas|casas de apuestas deportivas colombia|casas de
apuestas deportivas comparativa|casas de apuestas deportivas con paypal|casas de apuestas deportivas en chile|casas de apuestas deportivas en españa|casas de
apuestas deportivas en linea|casas de apuestas deportivas en madrid|casas de apuestas deportivas en mexico|casas de
apuestas deportivas en peru|casas de apuestas
deportivas en sevilla|casas de apuestas deportivas en valencia|casas de apuestas deportivas españa|casas de apuestas deportivas españolas|casas
de apuestas deportivas legales|casas de apuestas deportivas madrid|casas de apuestas
deportivas mexico|casas de apuestas deportivas nuevas|casas de apuestas deportivas online|casas de apuestas deportivas peru|casas de apuestas deportivas perú|casas de apuestas deposito minimo 1 euro|casas de apuestas depósito mínimo 1
euro|casas de apuestas dinero gratis|casas de apuestas en argentina|casas de apuestas en barcelona|casas de apuestas en chile|casas de apuestas en colombia|casas de apuestas en españa|casas de
apuestas en españa online|casas de apuestas en linea|casas de
apuestas en madrid|casas de apuestas en méxico|casas
de apuestas en peru|casas de apuestas en perú|casas de apuestas en sevilla|casas de apuestas en uruguay|casas de apuestas en valencia|casas de apuestas
en venezuela|casas de apuestas equipos de futbol|casas de apuestas españa|casas de apuestas españa alemania|casas de apuestas españa inglaterra|casas de
apuestas españa licencia|casas de apuestas españa nuevas|casas
de apuestas españa online|casas de apuestas española|casas de apuestas españolas|casas de apuestas
españolas con licencia|casas de apuestas españolas online|casas de apuestas esports|casas de
apuestas eurocopa|casas de apuestas eurocopa 2024|casas de apuestas europa league|casas de apuestas f1|casas de apuestas
fisicas en barcelona|casas de apuestas fisicas en españa|casas
de apuestas formula 1|casas de apuestas fuera
de españa|casas de apuestas futbol|casas de apuestas fútbol|casas de
apuestas futbol españa|casas de apuestas ganador eurocopa|casas de apuestas gratis|casas de apuestas ingreso minimo|casas de
apuestas ingreso minimo 1 euro|casas de apuestas ingreso minimo 5 euros|casas de apuestas inter barcelona|casas de apuestas legales|casas de apuestas legales en colombia|casas de apuestas legales en españa|casas de apuestas legales en mexico|casas de apuestas legales españa|casas de
apuestas legales mx|casas de apuestas licencia|casas de apuestas licencia españa|casas de apuestas lista|casas de apuestas
madrid|casas de apuestas mas seguras|casas de apuestas mejores bonos|casas de apuestas mejores
cuotas|casas de apuestas mexico|casas de apuestas méxico|casas de apuestas minimo 5 euros|casas de
apuestas mlb|casas de apuestas mundial|casas de apuestas mundial baloncesto|casas de apuestas
mundiales|casas de apuestas nba|casas de apuestas no reguladas en españa|casas de apuestas nueva ley|casas de apuestas nuevas|casas de apuestas nuevas en colombia|casas de apuestas nuevas en españa|casas de apuestas nuevas españa|casas de
apuestas ofertas|casas de apuestas online|casas de apuestas online
argentina|casas de apuestas online colombia|casas de apuestas online deportivas|casas de apuestas online
ecuador|casas de apuestas online en argentina|casas de apuestas online en chile|casas de apuestas online
en colombia|casas de apuestas online en españa|casas de apuestas online en mexico|casas
de apuestas online españa|casas de apuestas online mas fiables|casas de apuestas online mexico|casas de apuestas online nuevas|casas de apuestas online peru|casas de apuestas online usa|casas de apuestas online venezuela|casas de apuestas pago paypal|casas de apuestas
para ufc|casas de apuestas paypal|casas de apuestas peru bono sin deposito|
**mitolyn official**
Mitolyn is a carefully developed, plant-based formula created to help support metabolic efficiency and encourage healthy, lasting weight management.
References:
Genting casinos https://regandudu257291.thenerdsblog.com/
References:
Silver legacy casino a-taxi.com.ua
References:
Best online game sites warblog.hys.cz
References:
Europa casino download https://margiebpbd534708.blogzet.com/casino-of-gold-dein-ultimativer-guide-56646295
References:
Casino michigan https://leanrlu431459.tokka-blog.com
References:
Real money online poker notes.medien.rwth-aachen.de
Backbiome is an advanced daily wellness supplement formulated to help support spinal comfort, reduce feelings of built-up tension, and promote freer, smoother movement throughout backbiome everyday life.
References:
Council bluffs casinos http://kriminal-ohlyad.com.ua
References:
Winning at slots https://instapages.stream/story.php?title=kings-casino-rozvadov-poker-turniere-2026-alle-infos
References:
Play slots for fun https://dancewiki.site/
References:
Lady luck casino vicksburg ms https://neolatinswiki.site/wiki/Total_Casino_Beste_Slots_online_Willkommensbonus_DE
References:
Slots belgique https://nutritionwiki.space
References:
House of fun casino https://freudwiki.site/
References:
3d roulette https://bridgedesign.site/wiki/Offizielle_Seite_Jetzt_online_spielen
References:
Echtgeld casino europäisches roulette online
References:
Palms Casino Spiele online casino ohne lizenz deutschland
References:
Legiano Casino Zahlungsmethoden https://piratebooks.ru/proxy.php?link=https://bybio.co/karidubose